There’s nothing more satisfying than removing dry skin, better yet leaving it feeling like a baby’s bottom! No Spa, no problem. I’ve been preparing this DIY (Do It Yourself) Sugar Scrub for years! I think I started this as far back as high school. Even with youth on our side, our skin could always use some TLC (Tender Loving Care).
Did you know Skin is the largest organ in the human body? It’s 7 layers protect and guard muscles, bones, ligaments and all those internal organs that come to mind. In order to prevent dry skin from occurring, it’s important to take the time to care for it from the inside out. Just like we try to nourish our bodies with healthy food, hydration (water) and exercise, here’s a recipe to help nourish your skin.
What causes Dry Skin anyways? With the absence of specific skin conditions, usually skin becomes dry as a result of exposure to the elements. During the winter months if you notice, your hands and cuticles become much drier. The reason for this is the air lacks humidity. To add fuel to the fire (pun intended), being indoors with forced air and heat adds to the skin’s dehydration. On the flip side, during the summer months exposure to heat and sun, can also dry out this delicate organ.
With just a few simple and natural ingredients you can find at home, here’s my “Fountain of Youth” in a mason jar. Whether your in high school, college, 30’s, 40’s, 50’s, +60’s or pregnant you will absolutely love this!
I used this throughout my pregnancy (once a week) to keep the skin around my growing belly hydrated. Gentle exfoliation can encourage skin to regenerate new skin cells and hopefully prevent stretch marks. Fun fact, I did not use ANY over the counter skin creams or lotions while I was pregnant. Benzoyl Peroxide and Salicylic acids are harmful during pregnancy. Since most face creams include these chemicals, I decided to use coconut oil for everything! I literally NEVER skipped a day applying it to my entire body (face included) especially my belly. I’m convinced it helped prevent stretch marks!
Self-tanner or Waxing plans? Add this to your prep routine 1-2 days before your wax or spray tan appointment. It helps open up the skin around the follicles, ensuring optimal hair removal. Want to properly execute that at home self tanner? This scrub removes dead skin cells, thus guaranteeing more even color.
Before I kiss you goodbye… well blow you a kiss (proper social distancing), try this scrub on those luscious lips of yours! With these natural ingredients, you can even lick them afterwards! Enjoy (just don’t eat it all).
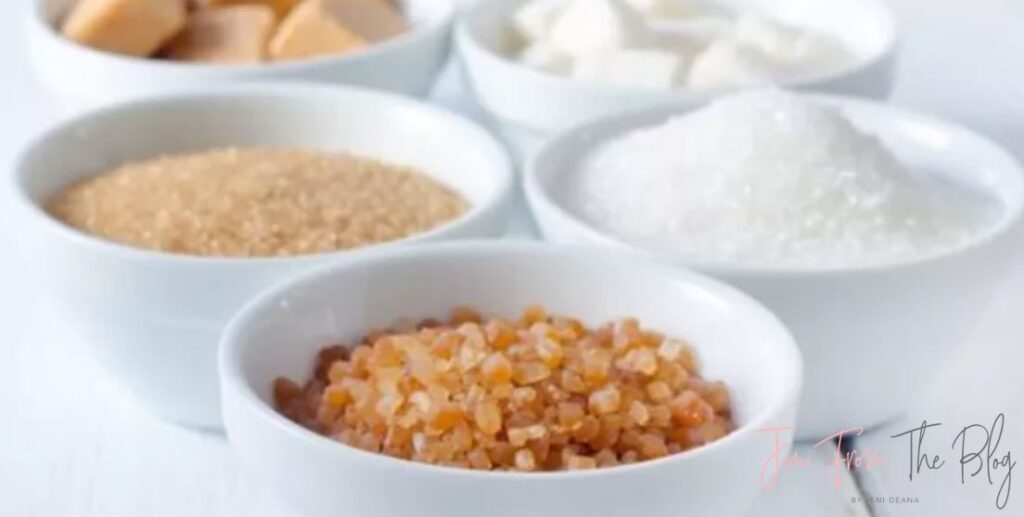
Pour These 3 Sugars On Me:
Hope you caught my joke there a.k.a. my corny twist on some 80’s rock band lyrics. There are 3 types of sugars you can use to make this DIY Sugar Scrub. Each has their own benefits. Although sugar in the raw is a staple in our home, as that’s all we use for our beloved coffee. I do keep pure sugar cane around for this reason. I tend to incorporate pure cane sugar the most in my scrubs. It works the best for my skin type. However, I suggest that you to try the different types to see what works best for your skin type.
Types of Sugar:
1. Pure Sugar Cane:
My personal Favorite. Good for all skin types and contains some essential nutrients. Can be used 2-3x per week.
2. Brown Sugar:
This sugar is best suited for sensative skin. It is the least abrasive, for this reason it is a good choice for a face scrub. Being that it is the most gentle, it can be used up to 4x a week.
3. Turbinado Sugar (Raw):
Sugar, Sugar in the cabinet, who’s the Coarsest of them all? This sugar has the largest granules, is the least processed “raw”, and holds the most essential minerals. Scrubs made with this can be used up to 2x per week.
Types of Oils:
1. Coconut Oil:
My ultimate favorite. Besides smelling so good, it’s moisturizing, has antiviral and antibacterial properties, better yet it won’t clog your pores! I go for the Virgin & Unrefined.
2. Olive Oil:
It may not smell the greatest, but that’s nothing a little vanilla extract can’t solve! It’s the first oil I used that got me hooked to making DIY Sugar Scrubs. It deeply penetrates into skin, due to its “humectant” properties. This draws more moisture into the skin. Great for soothing dry or itchy skin and giving it that flawless glow.
Directions:
1.) Place 1 cup of sugar in container adding 1 table spoon of oil at a time and mixing in between. Usually about 3-5 TBSP depending on the sugar and oil.
2.) Scrub should have a sandy consistency (not liquidy). If there’s too much oil it may dissolve the sugar and loose it’s exfoliating properties. Add more sugar if needed or oil to get the sandy texture desired. Store in mason jar or other container with lid.
3.) Apply to clean skin in bath or shower. Store, in cool place. Be mindful when left in the shower oils may liquefy. Just use a spoon or simply your finger to mix with sugar prior to use.
Optional: Add 1-2 tsp of Vanilla Extract or other essential oil i.e. Lavender.
Prep Time: 5 minutes or less
Expiration: Good for approx. 6 months
As always, thanks for stopping by! Hope you enjoy this as much as I do! Please leave comments below.
Love always <3 jeni deana xo